Tuesday, 21 July 2026

How to enable Examine (Diagnostics) menu in oracle forms r12

To Enable diagnostics  - examine menu in oracle forms.

If oracle R12 application forms menu does not show Help > Diagnostics > Examine.

Open the system administrator responsibility - system - profile options

Search for Profile, Utilities:Diagnostics and provide the username then search.

Set yes for both user level and site level and save.

Logout and login oracle forms again it will work.

Tuesday, 12 November 2024

To Find R12.2 Run/Patch file system using sql query


To determine the RUN file system:

SELECT EXTRACTVALUE(XMLType(text),'//oa_context_file_loc')
appl_top, status
FROM fnd_oam_context_files
WHERE name NOT IN ('TEMPLATE','METADATA','config.txt')
AND CTX_TYPE='A'
AND (status IS NULL OR UPPER(status) IN ('S','F'))
AND EXTRACTVALUE(XMLType(text),'//file_edition_type') = 'run';

To determine the PATCH files system:

SELECT EXTRACTVALUE(XMLType(text),'//oa_context_file_loc')
appl_top, status
FROM fnd_oam_context_files
WHERE name NOT IN ('TEMPLATE','METADATA','config.txt')
AND CTX_TYPE='A'
AND (status IS NULL OR UPPER(status) IN ('S','F'))
AND EXTRACTVALUE(XMLType(text),'//file_edition_type') = 'patch';

Saturday, 15 July 2023

To check discoverer reports and run count

 Sql Query to check  list of all discoverer reports and a run count:


SELECT STAT.QS_DOC_NAME,
STAT.QS_DOC_OWNER,
MAX(STAT.QS_CREATED_DATE),
COUNT(1)
FROM EUL_US.EUL5_QPP_STATS STAT
GROUP BY STAT.QS_DOC_NAME,
STAT.QS_DOC_OWNER
ORDER BY MAX(STAT.QS_CREATED_DATE) DESC
;

Sunday, 16 April 2023

Increase oracle User ICX:Session Timeout In E-Business Suite 12.2/12.1

ICX:Session Timeout to change the session Timeout in Oracle Apps R122 version:

Increase oracle forms session timeout in r122


To change oracle forms session time out via "ICX:session Timeout" Profile in oracle application.


ICX:Session Timeout is a profile provided in Oracle apps which controls the time for which a session is valid. Post that time out limit, the user gets below error.


Log on session is no longer valid. Would you like to log back in so you can continue working? If you do not log in, any outstanding data changes in your forms will not be saved.

When the user clicks on the Yes button, App opens the login page. Enter the password and login again to continue. Click No to exit from the current session.


30 minutes is the value of this profile in any production instance. It is fine for production instance but for development instance, this may not be ideal, as you will repeatedly get this message and you need to log in again and again.


Just increase the value of this profile to avoid the timeout message.


Set ICX:Session Timeout profile

Now let me show how you can change this profile. You can set this profile at the site or user level. It is always better to set at the user level.


Log in to Oracle Apps Instance. Navigate to System Administrator->Profile->System. Query profile the ICX:Session Timeout for the user. The default value is 30 and is set at the site level. We are going to set it a user level.


Enter the new value greater than 30 and click on Save.

Log off and log in again.

This will make sure that your Oracle apps session will never time out in a smaller interval.


Summary

ICX:Session Timeout provides an easy way to increase the session limit. It is good to increase only in development or test instance, but production let it be default 30.


This tip should work for both Oracle App 11i and R12 release. I hope you found this small tip useful. Please share and subscribe.


To set the User Session Timeout, test the following steps in a development instance and then migrate accordingly:


If suppose we executed autoconfig on application again default value 30 will be added to "ICX:session Timeout" Profile.


So we need to change the value in autoconfig file itself.


1.If R12.2 EBS instance view  $CONTEXT_FILE change the value for vairable "s_sessiontimeout" in config file then execute the autoconfig.sh in oracle application.


That will update the "ICX: Session Timeout" Profile in applications.


2.If R12.1.3 EBS instance view  $CONTEXT_FILE change the value for variable "s_oc4j_sesstimeout" in config file then execute the autoconfig.sh in oracle application.


That will update the "ICX: Session Timeout" Profile in applications.

Friday, 4 February 2022

How To Buy LIC IPO 2022 (As LIC Policy holders)

How To Buy LIC IPO

How to buy LIC IPO is the question the policyholders are keen to know as the initial public offering is about to file its draft papers with market regulators, SEBI in the coming week. 

The Finance Minister Smt. Nirmala Sitharaman in her 2022-23 Budget speech had said that the public issue of the LIC is expected soon. With the last quarter of the financial year is about to end, there is an eagerness for the mega initial public offering of LIC. The government is likely to file DRHP for LIC IPO by next week. 

There is a special percentage of quota for LIC policyholders too. As per reports, up to 10 percent of the issue size would be reserved for policyholders.

If a LIC policyholder would want to participate in the upcoming IPO, he or she needs to have two things, one is a PAN account linked to their LIC policy account, and a Demat account. In order to participate in LIC IPO as a policyholder, policyholders need to ensure that their PAN details are updated and linked. 

How To Buy LIC IPO For Policyholders With PAN details and Demat account, isn’t it the next thing that comes is how to buy LIC IPO? Termed to be the biggest ever IPO to hit the exchanges, the craze is unmatchable with some even buying new policies to be eligible for the mega IPO. So let us look at the steps to link the PAN card and updating process step by step for existing and new policyholders.

1) Check PAN availability status in Policy

Go To https://licindia.in/Home/Online-PAN-Registration
Enter your Policy Number, 
Date Of Birth(dd/mm/yyyy), and PAN Number in the required fields. 
Enter the Captcha in the designated box. 
Click on Submit. 
After clicking on submit, the next page will show the status of your LIC policy and PAN link. 

 2) Link PAN With Your Policy Number

Go to https://licindia.in/Home/Online-PAN-Registration 
Enter Date Of Birth(dd/mm/yyyy) as per PAN. 
Select your Gender. Enter Email Id, PAN Number, 
Full Name as per PAN, and mobile number in the required fields. 
Enter Policy Number and click Add Policy once you enter the policy number. 
Click on the self-declaration checkbox ( I hereby submit my PAN……..). 
Enter Captcha in the designated box. 
Click on Get OTP. Once you enter the OTP received on the registered mobile number and Email Id, the next page will link your PAN Card with your policy number.

Saturday, 2 October 2021

How to open oracle application forms in MS Edge(Internet Explorer is going retired)

 How to Open oracle EBS application forms and report in MS Edge(Due to Internet explorer is going to retired on June 2022).


Step to follow,

1.Open MS Edge browser then open browser setting - select default browser options - right side "internet explorer compatability"

Allow sites to be reloaded in Internet Explorer mode  option change to Allow

Let Internet Explorer open sites in Microsoft Edge option change to Allow.


Then restart the browser,

2.Enter the oracle application login link in the browser  then browser right corner click on the 3 dots then choose the "Reload the internet explorer mode" option.Browser will be refresh.


Now you can able to login and open the forms on MS edge brower.

Monday, 17 May 2021

Enable/disable users in fnd_user table (FND_USER_package)

To Enable /disable application users in fnd_user table using fnd_user_package.

To enable or diable single user in fnd_user table.

BEGIN
fnd_user_pkg.enableuser(username=>'lc_user_name') ;
END;

To enable or disable multiple users in fnd_user tables(remove or add end_date)
 
BEGIN
FOR i in (select * from fnd_user where user_name in ('user1','user2','user3'))
loop
fnd_user_pkg.enableuser(username=> i.user_name );
END LOOP;
COMMIT;
END;


You have encountered an unexpected error,please contact system administrator(disable/enable fnd_user end_dates)

 You have encountered an unexpected error,please contact system administrator,

While opening oracle R12 application url login , we getting above error,

"You have encountered an unexpected error,please contact system administrator".

This is happen due to disable and enable user end_dates in fnd_user table using updates scripts.

Answer: 1

Please try to disable and enable user end_dates in fnd_user table using fnd_user_packages,

BEGIN
fnd_user_pkg.enableuser(username=>'lc_user_name') ;
END;

Answer : 2

Try to disable and enable the user end_dates from application front end.

Above 2 solutions will resolve this issue. "You have encountered an unexpected error,please contact system administrator".

Please try to clear your internet explorer cache and cookies ,close and reopen the browser.

You must install the J2SE Plugin version 1.6.0_25. To install this plugin, (error)

While opening oracle r12 application forms, we get stuck with below error,

In order to access this application, you must install the J2SE Plugin version 1.6.0_25. To install this plugin, click here to download the oaj2se.exe executable. Once the download is complete, double-click the oaj2se.exe file to install the plugin. You will be prompted to restart your browser when the installation is complete.

Eventhough we installed java 6 if we got this error ,

Please add the application domain link to the compatability settings,

Internet explorer > open oracle r12 application url page > select settting/tools > drop down list choose the view compatability settings > add the application domain link > close.

Now it will open oracle forms.

Friday, 4 December 2020

CPU utilization reached 100% due to dead frmweb process running in EBS R12.

Form dead  "frmweb" Process Running for more than a day in EBS R12 Instance due to CPU utilization reached 100%.

Steps to resolve this issue.

Solution:

1.First we need to identify which process utilizing cpu occupying more using top command in application server.

oracle@hostname$top

  742 oracle   25   0  157m 101m  21m R 100.0  0.4 300312:47 frmweb
 7268 oracle   25   0 98.4m  52m  16m R 100.0  0.2 456687:38 frmweb

frmweb process utilizing cpu process more.

2.Need to look for frmweb processes are running for more than 12 hours,

oracle@hostname: ps -ef |grep frmweb

oracle    344 29925  0 Dec01 ?        00:00:36 /u01/apps/oracle/apps/tech_st/10.1.2/bin/frmweb server webfile=HTTP-0,0,1,default,1.4.6.2

oracle    742 29925 99 May08 ?        208-13:11:05 /u01/app/oracle/apps/tech_st/10.1.2/bin/frmweb server webfile=HTTP-0,0,1,default,1.0.0.8

oracle   3474 29925  0 Dec02 ?        00:00:24 /u01/app/oracle/apps/tech_st/10.1.2/bin/frmweb server webfile=HTTP-0,0,1,default,1.2.1.1

oracle   5232  3510  0 06:33 pts/2    00:00:00 grep frmweb

oracle   7268 29925 99 Jan20 ?        317-03:25:56 /u01/app/oracle/apps/tech_st/10.1.2/bin/frmweb server webfile=HTTP-0,0,1,default,1.2.1.7

process "724","7268" running long hours.

3.check for processess which is using high CPU by using top as command:

oracle@hostname:top

  742 oracle   25   0  157m 101m  21m R 100.0  0.4 312:47 frmweb
 7268 oracle   25   0 98.4m  52m  16m R 100.0  0.2 456:38 frmweb

4.Then verfiy that these high cpu occupying processes don't have a database session. This can be verified by below sql command,
 
 select * from v$session where process='<OS process id of frmweb process>'

Below sql query must not return any rows

 SQL> select * from v$session where process='742';

 no rows selected

More than one process is available means

 SQL> select * from v$session where process IN ('742','7248');

 no rows selected

5. Now check the process and kill it

oracle@hostname$ ps -ef|grep 742

oracle    742 29925 99 May08 ?        208-13:11:05 /u01/app/oracle/apps/tech_st/10.1.2/bin/frmweb server webfile=HTTP-0,0,1,default,1.0.0.8

oracle@hostname$ kill -9 742

oracle@hostname$ ps -ef|grep 742
              oracle 742 6226260   0 21:08:36  pts/0  0:00 grep 17170608


oracle@hostname$ ps -ef|grep 7268

oracle   7268 29925 99 Jan20 ?        317-03:25:56 /u01/app/oracle/apps/tech_st/10.1.2/bin/frmweb server webfile=HTTP-0,0,1,default,1.2.1.7

oracle@hostname$ kill -9 7268


oracle@hostname$ ps -ef|grep 7268
              oracle 7268 6226260   0 21:08:36  pts/0  0:00 grep 17170608

Then now check top command cpu utilisation comes to normal.

oracle@hostname$top
top - 09:57:14 up 27 days,  3:28,  4 users,  load average: 0.08, 1.88, 4.97
Tasks: 29 total,   1 running, 295 sleeping,   0 stopped,   0
Cpu(s):  0.0%us,  0.0%sy,  0.0%ni, 99.5%id,  0.4%wa,  0.0%hi,  0.0%si,  0.0%st
Mem:  24675248k total, 21263496k used,  3411752k free,   791976k buffers
Swap: 16777208k total,      160k used, 16777048k free, 13119852k cached

Monday, 5 October 2020

ORA-27101: shared memory realm does not exist

java.sql.SQLRecoverableException: ORA-01034: ORACLE not available
ORA-27101: shared memory realm does not exist
Linux-x86_64 Error: 2: No such file or directory

This error is occurring while trying to establish the database connection,This error occur due to  
1) Invalid ORACLE_HOME and ORACLE_SID or 
2) Database is down

[oracle@192 ~]$ sqlplus scott/tiger
SQL*Plus: Release 10.2.0.1.0 - Production on Wed May 22 16:48:05 2013
Copyright (c) 1982, 2005, Oracle.  All rights reserved.
ERROR:
ORA-01034: ORACLE not available
ORA-27101: shared memory realm does not exist
Linux Error: 2: No such file or directory

Scenario 1: Invalid ORACLE_HOME and ORACLE_SID:

ORA-27101 is usually due to the invalid ORACLE_HOME and ORACLE_SID parameters at OS level. You should investigate that ORACLE_HOME and ORACLE_SID are set correctly, and ORACLE_HOME should be without trailing slash.

[oracle@192 ~]$ echo $ORACLE_HOME
/u01/app/oracle/product/10.2.0/db_1

[oracle@192 ~]$ echo $ORACLE_SID
testdb

In our case ORACLE_SID was not correct, we need to export ORACLE_SID to the valid one which is ora10g

[oracle@192 ~]$ export ORACLE_SID=ora10g
[oracle@192 ~]$ sqlplus scott/tiger
SQL*Plus: Release 10.2.0.1.0 - Production on Wed May 22 16:52:11 2013
Copyright (c) 1982, 2005, Oracle.  All rights reserved.
Connected to:
Oracle Database 10g Enterprise Edition Release 10.2.0.1.0 - Production
With the Partitioning, OLAP and Data Mining options


Scenario 2: Database is down:

You may also face it when the database is down, to solve ORA-27101 you may have to start the database only

[oracle@192 ~]$ sqlplus sys/sys as sysdba
SQL*Plus: Release 10.2.0.1.0 - Production on Wed May 22 17:07:38 2013
Copyright (c) 1982, 2005, Oracle.  All rights reserved.
Connected to an idle instance.

SQL> startup
ORACLE instance started.
Total System Global Area 1224736768 bytes
Fixed Size                  1219112 bytes
Variable Size             167773656 bytes
Database Buffers         1040187392 bytes
Redo Buffers               15556608 bytes
Database mounted.
Database opened.

Thursday, 9 July 2020

Resolved BI publisher install and addin issues(Translation file not found)

This tutorial explains resolution for facing issues while install Oracle BI Publisher Desktop for Word/excel (on Windows). 

This resolution for installation is for Microsoft Office 2007, 2010, 2016 ,etc.

Please download any required version of  BI Publihser32.exe to insall is best for all its working fine for windows 64 or 32 bit version.

!!!!!Please contact me if you need above mention old version and new version(whatsapp : +919043616169)!!!!!!!

1.Before starting to install BI publisher please confirm version of windows and microsoft offfice.

Windows os 7
Microsoft office 2007

You have to download and install Both bipublisher32.exe(12.0.0) and bipublisher32.exe(11.1.17) version to work on Addins perfectly.

For example to work on Word template Addins you need "Bipubllihser32.exe(12.0.0) version.
If you install this version then only you able to see  Word Addins."Bipublisher"
(This version Excel Addins not available)

If you need to work on Excel template Addins you need to install Bipublisher32.exe (11.1.17) version on already installed location bipublisher(12.0.0) location.
You can able to see the "BIpublisher" Addins in excel.Suppose if not display please follow below,
go to "C:\Program Files\Oracle\BI Publisher\BI Publisher Desktop\DotNetInstallFiles"

Execute "ETBMenuSetup2003.exe" this setup , then if reopen excel you able to see the Addins "BIpublisher".

Suppose if you installed only Bipublisher (11.1.17) version Excel Addins only work perfect but Word will not work perfect you will get error while loadind xml
"Translation not found error" and so many error.

2.Suppose If you have below version of windows and microsoft offfice.

Windows os 10
Microsoft office 2016

You have to download and install latest version of  bipublisher32.exe(12.2.4) only  Both Excel and word  Addins works perfectly on your pc

3.After installing Bipublisher32.exe setup , need to run the below file to show the Word or Excel Addins "BIpublisher".

To Install Bipubliser Desktop version go to link "https://kirthikannan.blogspot.com/2020/07/install-oracle-bi-publisher-desktop-for.html"

Go to "C:\Program Files\Oracle\BI Publisher\BI Publisher Desktop\DotNetInstallFiles"

Run "ETBAddInSetup.exe" to install/setup/show the Excel Addins "Bipublisher".
(ETBMenuSetup2003.exe setup will only be available in Bipublisher 11.1.17 only)

Run "TBAddInSetup.exe" to install/setup/show the Word Addins "Bipublisher".


Error We faced while installing and setup Bipublisher desktop and Addins:

Below error due to multiple java version installed so please uninstall all java versions also remove the path then reinstall the latest or compatable vesion.

Then retry to load the data issue resolved.


2.This error due to wrong tag configured on Application Developer responsibility > Application > Lookups > Application Object Library > Query in Type "XDO_TEMPLATE_TYPE"
Check and enable checkbox in "XLS" and Enter "XDO_XLS_TEMPL_OUTPUTS" in Tag field and save.


3.This error due not compatable Bipublisher version installed for word ,Pleae install the Bipublihser desktop 12.0.0 version . this issue resolved.


Please contact if you have not able to resolve the above any of the issue.

Below Installation steps for Bipublisher Desktop any version(Better to install 32 bit version)

Installing Oracle BI Publisher Desktop for Word (for Office) is not a difficult task.

First you have to download it from Oracle. You will get the BIPublisher32.exe or BIPublisher64.exe file.

Run this file and you will get the following screen:


Choose the language for installation and click on "OK".


When the preparation is done, you will see the following screen:


Click on "Next".


Choose a directory for installation and click on "Next". When the installation is done, you will see the following screen:


When you open the Microsoft Word you will see "BI Publisher" and you can use this Add-in.

Please update if issue being resolved.!!!!!
gkannan21@gmail.com

Install Oracle BI Publisher Desktop for Word and excel

This tutorial explains you how to Install Oracle BI Publisher Desktop for Word (on Windows). This installation is for Microsoft Office 2007, 2010, 2016 ,etc.

Installing Oracle BI Publisher Desktop for Word (for Office) is not a difficult task.

First you have to download it from Oracle. You will get the BIPublisher32.exe or BIPublisher64.exe file.

Run this file and you will get the following screen:


Choose the language for installation and click on "OK".


When the preparation is done, you will see the following screen:


Click on "Next".


Choose a directory for installation and click on "Next". When the installation is done, you will see the following screen:


When you open the Microsoft Word you will see "BI Publisher" and you can use this Add-in.

Thursday, 2 July 2020

How to enable microsoft excel template in oracle application R12

How to enable/add microsoft excel as a type to create template list of values in oracle application R12

Goto XML_PUBLISHER_RESPONSIBILITY > TEMPLATES > Trying Create Templates as "Microsoft Excel" But excel option is not showing.


To Enable Create template using "EXCEL"

1.Enable "XLS" options in XDO_TEMPLATE_TYPE lookup code:

Application Developer responsibility > Application > Lookups > Application Object Library > Query in Type "XDO_TEMPLATE_TYPE"

Check and enable checkbox in "XLS" and Enter "XDO_XLS_TEMPL_OUTPUTS" in Tag field and save.


2.Also Check the Enable option for EXCEL in "XDO_XLS_TEMPL_OUTPUTS" lookup codein Query Type.


Make sure Excel options is enabled.

3.Now goto XML_PUBLISHER_RESPONSIBILITY > TEMPLATES > Create Templates check "Microsoft Excel" is enabled.


Wednesday, 6 May 2020

Link your custom godaddy domain to your blogspot account.

If you purchased custom domain in godaddy have to link your custom domain(pics.com) to blogspot account(pics.blospot.com).

1.Please login into your blogspot account goto settings > basic > published tab > click the setup third party account.


2.Enter your custom domain name like "www.pics.com" without omitting "www" as below screenshot.


3.click save you will get an error sayings " we have not been able to verify authority of your domain".

Please take this screenshot for your future reference as shown in below.
Please note the highlighted details in your screenshot.


3.Login into your godaddy account, goto my products > IN domains (select manage) > Additional setting or find the "manage DNS" options > select manage DNS

Domain records list will show here,


4.check CNAME record is there if available try to edit the record 

Add below details its default for google blogspot accounts.

Hostname :  www

Point to   : ghs.google.com
TTL     :1 hour

 5.Click ADD one more CNAME options points to your blog.


    hostname :  copy the hostname  you taken screenshot from  blogspot in 3 rd step

    Point to   : copy the point to link you taken screenshot from  blogspot in 3 rd step
    TTL : 1hours

6.Here you need to add 4 IP addresses which are common for all the blogger users at the same record table shown above.

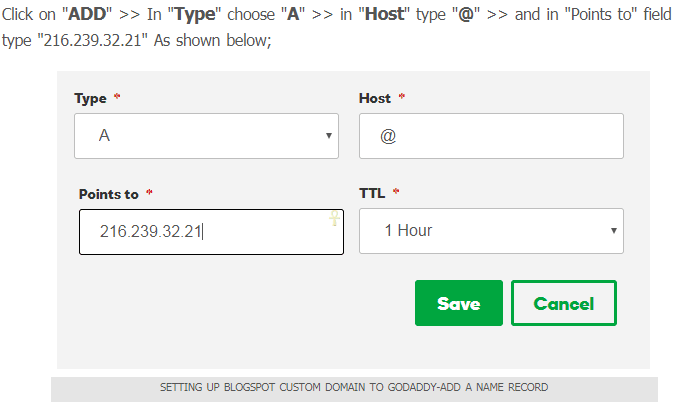
Click on "ADD" >> In "Type" choose "A" >> in "Host" type "@" >> and in "Points to" field type "216.239.32.21" As shown below;


Again as same as above, including all add following 4 address;

216.239.32.21
216.239.34.21
216.239.36.21
216.239.38.21
 Now domain record show below,


Once you completed all the above steps, then its time to save all the settings and publish the blog.


Again  goto blogspot settings > basic > published tab > save it ,Wait for 1 hours to process your request.